Saturday, January 28, 2012

Adventure Time!

What time is it? ADVENTURE TIME!!
My son is in LOVE with the show. He actually told me this week "I am so glad today is Monday, because a new Adventure Time comes on tonight." To be honest I have never seen the show, but with all my "research" I put in to making his Adventure Time Painted Shoes for Christmas I know all the charaters' names and can draw them all. =) I am sure that this is time I will never be able to recoup. But with his birthday coming up I know what the theme for this year will be!!
I thought it would be a neat gift to make him a set of Adventure Time characters for his birthday (it's in March so I will have plenty of time). Here are the first:
Finn and Jake:


Finn the Human


Jake the Dog


Ready for adventure...


Stay tuned for Princess Bubblegum and Rainicorn!!


Been busy...

I have been busy lately, that is why I only have 2 posts this month. What have I been doing? Making these:


My shop on Etsy was looking a little empty so I took a couple weeks and made some more waldorf dolls. I am done now so on with some projects that I have been itching to do and more posts I promise!

Thursday, January 26, 2012

Brown and Pink Butterfly and Flower Mural


I painted another plywood mural this time for my daughters room. Here is the post of my other huge plywood paintings: Damask Painting.  My daughter Jaden's room is painted a brownish/pink (I think the color was called Hot Coco but I swear it is pink, just not nauseatingly pink) she has a huge blank wall behind her bed. I wanted to paint a mural on it but I know how many coats of paint and primer that you need to apply to cover up a old mural and it will be much easier to change when she gets tired of butterflies.

 I cut a thin piece of plywood 3 feet by 6 feet and drew out a design onto the board with pencil.


Next you paint the background of the board. You might need to redraw some of your lines. I just used acrylic paint that you can find anywhere, even Wal-Mart.


Next you paint the design. It is easier if you have a solid color background so if you make a mistake you can easily cover it up, so if you have a gradient background be extra careful because it is really hard to fix a mistake.


And there you have it! A huge painted mural, cheaper than a huge canvas painting and easier to change out than a wall mural.


I would include a photo of her room except in true Jaden fashion it looks like a tornado fit it today.
Hope you all are having a great day!


Monday, January 2, 2012

Piggie & Gerald Crochet Dolls

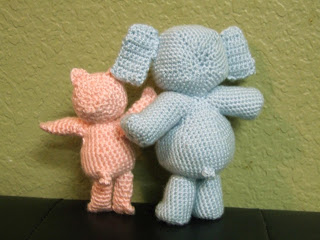
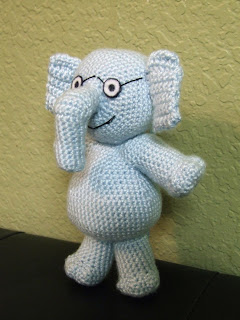
Piggie and Gerald Hand Crocheted Dolls

One of the projects that I worked on during this Christmas break was some Gerald and Piggie dolls/figurines for my son. He is a HUGE Mo Willems fan (he even had a Piggie and Gerald themed birthday party this year: read about it here and here.)  If you don't know who Piggie and Gerald are then go to the library!! The Piggie and Elephant Books by Mo Willems are my son's absolute favorite. He has read every book about 30 times each. So I thought that some little cute figurines to act out their adventures would be a great idea for him. Here is what I came up with...

Piggie and Gerald Crocheted Dolls/Figures


Crocheted Piggie and Gerald Dolls/Figurines

They are made entirely from my own pattern, (really proud of myself, this is my first).
I am going to make another set to sell on Etsy, hopefully it goes faster than this trail and error first set I made. I might even sell the pattern after a few more sets (need to make sure that the pattern makes sense.)

Crochet Piggie and Gerald Dolls based off of Mo Willems books

The dolls are crocheted with felt eyes (and mouth for Piggie). I embroidered Gerald's glasses and mouth and Piggie's snout and eyebrows.

Crocheted Piggie and Gerald Dolls

Piggie and Gerald handmade dolls/ figurines

Piggie and Gerald Crocheted Dolls

If you are interested I have a pair listed on Esty, you can click here.

Piggie and Gerald Handmade Dolls


Sunday, January 1, 2012

Camo Travel Marker Kit

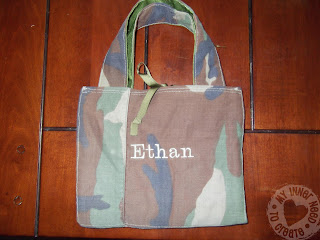
Camo Travel Marker Bag

Camo Travel Marker Bag

Here is another Christmas gift that I made this year. This Camo Travel Marker/Art kit is for my nephew. He is 5 years old and he loves to draw and color. He rides back and forth between his mother and father's house a lot so I thought that a car friendly art kit would be great for him.

When I was digging through my fabric/ clothes to refashion pile in my closet looking for something to make the bag out of, I found an old pair of camouflage fatigues. They are the perfect combination of thick material and boyish print that I was looking for.

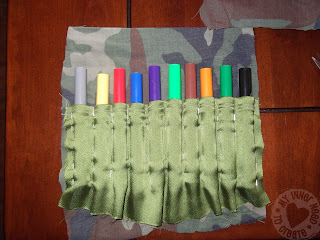
I cut off the bottom of both legs of the pants and trimmed them in to 4 rectangles (the size is determined by what you want to put in the bag). Next cut out a shorter rectangle from a different fabric for the pocket, make sure to increase the width of this piece by almost double. Roll the top unfinished edge and sew across. I then laid out all the markers and pinned the pocket around the markers.

Camo Travel Marker Bag

Remove the markers and sew.

Camo Travel Marker Bag

Pin the bottom of all the marker pockets to one side and sew across.


Create the pocket the same way on the other side. It can hold anything you want- I thought about doing colored pencils but decided that some art pencils and notebook would be better (didn't have them bought when I was making the bag so I used pencils the same size).

When the pockets on both sides are finished, put right sides together and sew across bottom.

Now take the 2 rectangles (of camo fabric) that don't have anything sewed to them and sew them together at the bottom width.


After this step I embroidered his name onto the panel that will be the front of the bag.


Now take the panels with the pockets and the panels with the embroidery and put them right sides together.


Sew down the 2 sides of the bag. Do not sew the tops or the middle of the bag, this will prevent you from flipping it inside out.


Flip it inside out and sew down the 2 sides and across the middle to make the bag lay nice and flat.


Leave the tops of the two sides open.


Now, cut out 2 strips from the main color and 2 strips from the alternating color. The width and lenght will be your preference. I wanted mine thicker and shorter (so it would be less like a purse and more like a briefcase) so I did mine 2.5 inches by 8 inches.


Sew right sides together, flip and sew around straps.


Fold the top of the bag inside, hiding the raw edge. Pin the handles and  a ribbon (if you want a tie closure) and sew across.


Both sides...


And you are done! A perfect travel art kit.


A perfect gift for any little kid in your life. I am in the process of making 3 more for my kids (crayons for the youngest) and trying to find a pink camo for the girls!