Sunday, August 12, 2012

Welcome Baby to the World Shirts

Welcome Baby Freezer Paper Painted Shirts

So my little sister had her baby, a little boy =)
Thinking ahead I came up with this idea to make my whole family shirts to wear to the hospital to welcome the newest addition to the family (I also thought it would make cute photos).

Welcome Baby Freezer Paper Painted Shirts

I headed over to the dollar store and the only color of shirts that ranged in sizes from XS Child to Large Adult were black- but since the sex of the baby was a surprise I thought that black was pretty gender neutral!

Welcome Baby Freezer Paper Painted Shirts

I designed the shirts to not be so cutesy that my husband and Dad wouldn't wear them, and so that we could wear them again.
Here is what I came up with:

Welcome Baby Freezer Paper Painted Shirts

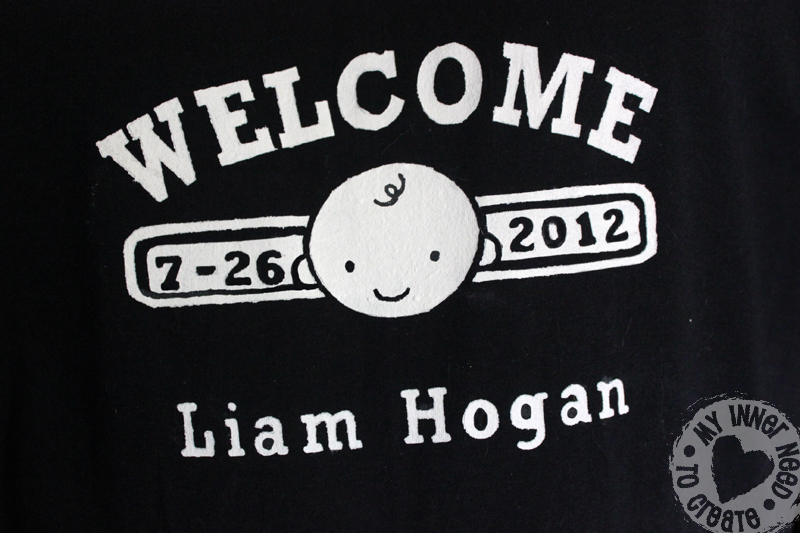
Now because I didn't know when the baby would be born or his name, I split the design into 2 pieces. The part that I could do ahead of time was the Welcome, the baby and the placards on both sides.


I used the freezer paper technique to do the painting, if you don't know about this technique you can check it out here and here. I printed out the pattern in the size I needed and used it to cut out my pieces.


I ironed it on and painted. I left out the eyes and mouth on the baby and just painted them on to the face in black after the white had dried.

Welcome Baby Freezer Paper Painted Shirts


Here is what it looked like after 3 coats of white paint:


Welcome Baby Freezer Paper Painted Shirts

And this is how they sat for weeks waiting on my sister....

Welcome Baby Freezer Paper Painted Shirts

As soon as I got the call about the baby arrival (and his name!) I used my cricut to cut out the date and name from the freezer paper and ironed it on.

Welcome Baby Freezer Paper Painted Shirts

I was in a hurry so I used a blow dryer and spread it on thick to try and hurry things along. 

Welcome Baby Freezer Paper Painted Shirts

They came out fine and the photographs when we met the new little guy turned out great! 

Welcome Baby Freezer Paper Painted Shirts

Welcome Baby Freezer Paper Painted Shirts

I made Liam a shirt also. I bought an extra shirt and used Dana's 90 min shirt tutorial. I forgot to take a photo of his shirt, so this is the best I have:

Welcome Baby Freezer Paper Painted Shirts

His only has the baby and his name.

Welcome Baby Freezer Paper Painted Shirts

I love how they turned out and how everyone who saw our group wandering through the hospital knew why we were there and how excited we were.
Hope y'all are having a great weekend!

Sunday, August 5, 2012

Project Run & Play Open Auditions


Ok, so it is that time again, open auditions to Project Run and Play. Season 5 is going to start on September 10 and the designers have been chosen, except the last 2, they are chosen through this open audition. So here is my entry:


I made the bodice by basket weaving strips of gray and white fabric (folded like bias tape and sewed on both sides).

I sewed the top and bottom of the strips together but left the middles unattached, I like the way they move when my daughter moves.


I followed the white horizontal strips to the back where I used buttons to close the dress and allow the dress to be less boxy and more a natural shape.


For the skirt I used a gray and white striped light cotton fabric.


Here is my sew along entries from last season...


I had so much fun creating all of them I can't wait for this season, even if it is only in the sew along again.
I am off to Galveston to take the kids to the beach, I hope you all have a good week!

Wednesday, August 1, 2012

Detailed Freezer Paper Stenciling


So I, and I know you have also, seen a million freezer paper t-shirts/designs. I have only used the technique on some fabric favor bags for my sons' birthday party. But I got this really great idea to make t-shirts for my family to wear to the hospital to welcome my sister's baby  (she had the baby by the way, a boy, Liam a couple days ago) and so I wanted to practice with the paper and see just how detailed the technique would allow me to go.

So I used a couple dollar store tee shirts and got to cutting...


The robot turned out the best, I think because the silver paint was thicker... or maybe because it was the 3rd shirt I had done and I was just better at it?


In case you didn't know, here's how I did it:
Draw out, or print out, the image you want on the shirt in the size you want. Black out the areas that you are cutting out (they will be the parts that will be painted) so these black areas on the mermaid princess will actually be white from the paint.


Trace it on to the freezer paper, not the waxy side.


Cut out the areas that you are going to paint. I tried to leave most of the image connected so I didn't have a lot of little pieces floating around but I did have a few in the hair.


I decided not to cut out any pieces from her face and just drew them in with a small paint brush after I pulled off all the paper.


Next, iron. I think it worked the best with a really hot dry iron. Do not pull it up to reposition, this is a one shot thing. The wax will melt a little into the fabric and hold it in place but once removed it won't work again.


A couple of my edges didn't stick well but when I was sponging on the paint I just made sure to sponge only on top of the paper to lay it down and the paint held it there pretty good.


I sponged on 3 layers of the white paint since I was painting a light color onto a darker shirt. For the robot shirt I only did 2 layers.


After the shrits are dry, pull the paper away and you are done!


The kids are happy with the way they turned out.... mostly because they were what they asked for.


Julia loves mermaids and princesses, in fact she wants to be a mermaid when she grows up.


Jaden thinks she is already a princess, so I made hers a fairy tale princess.


 I really like my son's, it really makes a plain shirt special.


 I also really like the silver paint, need to come up with an idea for a shirt for me =)


The technique worked out really good for small detailed designs, so I did end up using it for the shirts I made for my family... that is my next post!